Table of contents
Prerequisits
- Go through the system-setup and make sure the system is operational.
- Setup should be done in DDC_V mode (minimum version: 124)
- Two modules are loaded and connected into slot 1&2 of recorder2
- Make sure you have loaded the correct modules intended for recording the GMVA session
DBBC3 initialization
- on the DBBC3 desktop double-click:
DBBC3 verification
- log into the control computer as user oper
- in terminal:
cd  /home/oper/rottmann/dbbc3/utilities
./setupDBBC3_DDC_V.py -i A B 192.168.0.60
- Check that all responses are [OK]
- In case of warnings or errors follow the suggestions printed by the script.
Mark6 module initialization
- Skip this section if there is already recorded data on the modules! The following steps will delete all data on the modules!
- log-into recorder2 as user oper: ssh recorder2
- execute: da-client
- in da-client:
mod_init=1:8:{VSN}:sg:new            replace     {VSN} with VSN as indicated on the label of module1
mod_init=2:8:{VSN}:sg:new        replace {VSN} with VSN as indicated on the label of module2
group=new:12
Mark6 setup
- log-into recorder2: ssh recorder2 -l oper -X
- execute: m6service_restart
- execute: da-client
- in da-client:
mstat?1
mstat?2
make sure the group is NOT in "open" state. If it is in "open" state you must first do:
group=close:12
Otherwise continue with:
input_stream=add:DBBC31:vdif:8224:50:42:eth3:::1
input_stream=add:DBBC32:vdif:8224:50:42:eth5:::2
input_stream=commit
group=open:12
mstat?1
mstat?2
The last statements should report the group to be in open:ready state, e.g.:
!mstat?0:0:12:1:MPI%3211/32000/4/8:8:8:31989:32000:open:ready:sg;
!mstat?0:0:12:2:MPIP%016/32000/4/8:8:8:31989:32000:open:ready:sg;
Loading/starting the schedule
- log-into recorder2 as user oper: ssh recorder2 -l oper -X
- Download/copy the vex file into the directory: /home/oper/shared/schedules
- Translate the vex-file
cd /home/oper/shared/schedules
vex2xml.py -f {vexfile} -s PV  (the station code must be the same than in the vex file)
less {vexfile} -s PV
- Check the contents of the produced xml-file. It should not be empty and contain several scan entries, similar to this:
<experiment name="a90xx" station="PV" start="2015090003000"  end="2015090032200">
        <scan experiment="a90xx" source="3C279" station_code="PV" start_time="2015090003000" duration="420" scan_name="090-0030"/>
        <scan experiment="a90xx" source="3C279" station_code="PV" start_time="2015090004500" duration="420"
        <scan experiment="a90xx" source="3C279" station_code="PV" start_time="2015090031500" duration="420" scan_name="090-0315"/>
</experiment>
NOTE: If the file is empty check that the station code given in the vex2xml.py command matches the station code for Pico Veleta of the vex-file.
- Start the schedule
- Method 1 (prefered):
ssh recoorder2
cd ~/shared/schedules
start_gmva.py {xmlfile}
where {xmlfile} is the xml-file produced by vex2xml.py (see above).
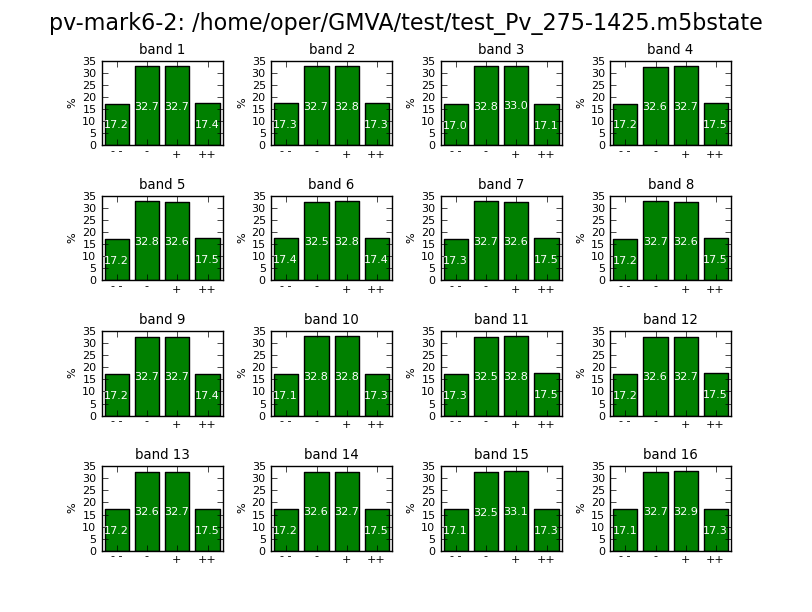
The script will start the schedule and in the scan gaps will display graphical information about the 16 PFB channels (bandpasses, and 2-bit statistics). The output is also stored in text-format under /home/oper/GMVA/{code}.
 |  |
- Method 2 (backup):
ssh recoorder2
cd ~/shared/schedules
M6_CC -f {xmlfile}
where {xmlfile} is the xml-file produced by vex2xml.py (see above)
End of session / Module change
When the session has ended or when a new module needs to be inserted:
- in da-client:
group=close:12
group=unmount:12
turn the module keys off and remove the modules.