Table of contents
Prerequisits
- Go through the system-setup and make sure the system is operational.
- Assumption: Fibre cable is connecting the FiLA10G to eth2 of pv-mark6-1
- A single module is loaded and connected into slot 1 of pv-mark6-1
- Make sure you have loaded the module intended for recording the GMVA session
FiLA10G Setup
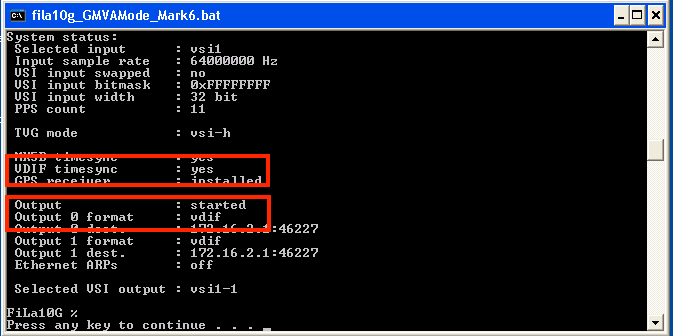
- On the DBBC2 desktop double-click the icon labeled "fila10g_GMVAMode_Mark6.bat". This will setup the FiLA10G for recording on the Mark6 and will do the time-synchronisation. (The icon is a shortcut to the following file: C:\DBBC\bin\fila10g_GMVAMode_Mark6.bat).

- Confirm settings. In the terminal window that has opened the last page lists the output of the sysstat command. Inspect the output; in particular check that VDIF timesync is showing "yes" and "Output" is showing "started" (see image below).
Mark6 module initialization
- Skip this section if there is already recorded data on the module! The following steps will delete all data on the module!
- log-into pv-mark6-1 as user oper
- execute: da-client
- in da-client:
mod_init=1:8:{VSN}:sg:new            replace     {VSN} with VSN as indicated on the module label
group=new:1
input_stream=add:DBBC2:vdif:5032:50:42:eth2:::1
input_stream=commit
group=open:1
mstat?1
The last statement should report the group to be in open:ready state, e.g.:
!mstat?0:0:1:1:MPIH%016/48008/4/8:8:8:45160:48008:open:ready:sg;
Mark6 setup
- log-into pv-mark6-1 as user oper
- start da-client
-
mstat?1
-